Orthomosaics are one of the most valuable outputs in drone mapping, providing highly accurate, distortion-free aerial images used in surveying, agriculture, construction, disaster assessment, mining, and more. But how exactly are orthomosaics created? In this post, we break down the step-by-step process—from flying the drone to generating a map-ready orthomosaic.
1. Flight Planning
The process begins with a well-designed flight plan. Key tasks include:
- Defining the area of interest (AOI)
- Setting altitude and flight path
- Choosing image overlap (typically 70%–80% front overlap, 60%–70% side overlap)
- Ensuring good lighting and weather conditions
A proper plan ensures full coverage and minimizes errors later in processing.
2. Drone Image Acquisition
The drone follows the planned route and captures hundreds or thousands of overlapping photos. Each image is:
- Geotagged with GPS coordinates
- Captured from a consistent altitude
- Shot with enough overlap for accurate stitching
Higher-resolution cameras and stable flights result in better-quality orthomosaics.
3. Data Transfer & Pre-Processing
After the flight:
- Images are transferred from the drone to the computer or cloud.
- Blurry or overexposed images are removed.
- EXIF data is checked for GPS accuracy.
Some workflows also use Ground Control Points (GCPs) to improve positional accuracy.
4. Photogrammetry Processing (Structure-from-Motion)
This is where software like ODM, WebODM, Agisoft Metashape, Pix4D, or custom drone mapping tools perform complex calculations.
a. Feature Matching
The software identifies common features across overlapping photos.
b. Sparse Point Cloud Generation
Matches are combined to estimate camera positions and scene geometry.
c. Dense Point Cloud Generation
A high-resolution 3D point cloud is built for terrain reconstruction.
5. Digital Elevation Model (DEM) Creation
From the dense point cloud, the software generates:
- DSM (Digital Surface Model) — includes buildings, trees, etc.
- DTM (Digital Terrain Model) — bare earth model after removing objects
DEM is crucial for correcting perspective distortions.
6. Orthorectification
This step corrects each image for:
- Camera tilt
- Lens distortion
- Terrain elevation differences
Using the DEM, each pixel is projected onto a uniform coordinate system so that distances and areas are accurate.
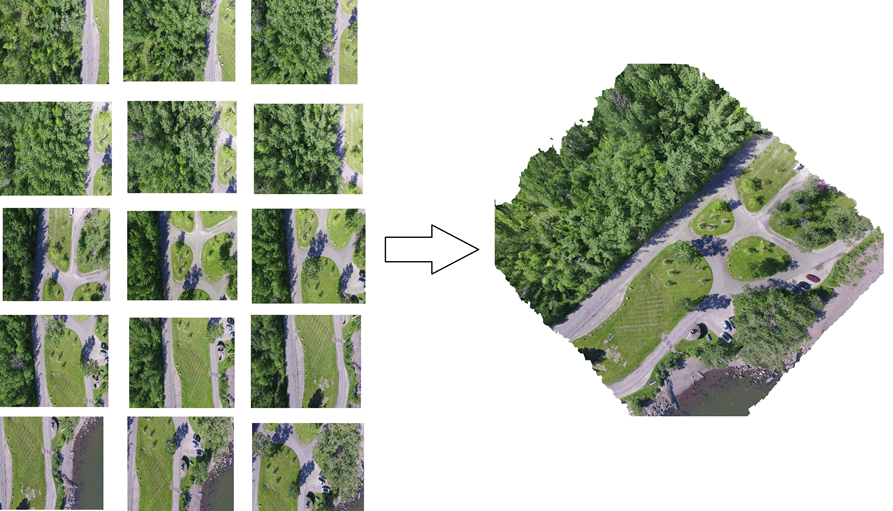
7. Image Stitching & Mosaicking
The corrected images are blended together:
- Color balancing
- Seamline optimization
- Edge correction
- Exposure normalization
The result is a seamless, high-resolution orthomosaic.
8. Exporting the Orthomosaic
Finally, the orthomosaic is exported in GIS-ready formats like:
- GeoTIFF
- JPEG + world file
- Cloud-optimized GeoTIFF (COG)
You can now view and analyse it in tools like QGIS, ArcGIS, CesiumJS, or your custom mapping application.
Conclusion
Orthomosaic generation is a detailed workflow combining drone hardware, careful planning, and powerful photogrammetry algorithms. Whether you’re mapping farmland, construction sites, or large infrastructure projects, understanding the steps ensures better accuracy and smoother operations.
If your organization needs a custom drone mapping platform tailored to your exact workflow—faster, more secure, and far more cost-efficient than DroneDeploy or Pix4D—our team at Manya Technologies can help. We build end-to-end solutions including photogrammetry processing, 3D visualization, point-cloud handling, annotations, measurements, integrations, and AI-based analytics. Contact us today to discuss your requirements and get a fully customized, scalable, and budget-friendly drone mapping system for your business.